Turning the lights on/off ON Kubernetes cluster nodes
Since I'm the person going around the house and turning the light switch off more often than not, I'll apply that same role on my blog today.
No, that doesn't mean I'll turn the lights off on this blog, shut it down and stop publishing. Even though I'm not sure how many of you read my ramblings, I'm not going to stop it, here, at least.
Now let's get back to the essentials - what is the purpose of this article?
Well, last time I wrote about LightSwitchOps and how to apply the concept within the Kubernetes cluster pods. In this article, we will change our perspective. Move further down or up the level. I never know, to be honest. But, that's why we are here, to make mistakes, and learn from them, no? In this article we will focus on Kubernetes nodes and see what could be some approaches to scale them down when not used, or up, when the usage increases.
The main focus of this article will be looking into Cluster Autoscaler and Karpenter. What they are, how they work, and why you should use one or the other, or both. I don't know, yet, but let's use this article to explore the topic together.
Cluster Autoscaler
Cluster Autoscaler is a tool that can automatically scale up or down your Kubernetes nodes. It changes the number of nodes in these two cases:
- There are some pods that failed to run in the cluster due to insufficient resources - in this case it will spin up a new node.
- There are some nodes in the cluster that have not been utilised for an extended period of time, and pods there can be easily moved elsewhere. In this case, nodes are removed from the cluster, and machines turned off.
Now, all this seems simple, and it sure is. But it has some complex setup, and some amount of manual intervention. You can run the Cluster Autoscaler on the cloud provider of your choice. I've had a chance to run it on AWS some time ago, and it was working okay.
The whole setup runs as a Deployment, and to run it on AWS, in short, you need to do the following:
- Setup proper permissions.
- Configure Auto-Discovery Setup - configuration that tells Cluster Autoscaler where to look for nodes on the cluster, and which nodes to take into account for scaling. This is a preferred and recommended way to configure Cluster Autoscaler.
- Manual configuration of nodes - also an option, and it will require passing
--nodesargument at the startup of Cluster Autoscaler. - Decide on the instance size - can be mixed instances, spot instances.
- You can also use a static instance list of the instances you want to include in your cluster setup.
The setup is rather straight-forward, and you can find more information on the link below.
And, the list of supported Cloud Providers where you can run all this is quite long.
In essence - if you would like to have a tool that simply turns off and deletes the cluster node when it's not used, and creates one when you need it - Cluster Autoscaler is the way to go.
However, when you have a new workload that is not supported by the current list of nodes, e.g. it requires an ARM processor, we would need to add a whole new node group to AWS and to reconfigure Cluster Autoscaler to support it.
Sounds a bit tiring isn't it? It sure can be. Read along to find out how we can mitigate this.
Karpenter
If you run your workloads primarily on AWS and want a fine-grained scaling option, Karpenter is your weapon of choice! Although carpenters uses hammers, and chisels, and whatnot, as their weapon of choice, but carpenter with K... Sorry, I got carried away. Let's continue.
Karpenter is also a tool that automatically provisions new nodes when the pods cannot be scheduled on the current ones. It is Open Source (same as Cluster Autoscaler), flexible, and high-performance autoscaler.
Mainly developed for AWS, it also works with other Cloud Providers. But, from the documentation, I somehow feel, the focus is mainly on AWS, because it was developed by them. All instructions on how to set it up, how to migrate from Cluster Autoscaler, are using AWS underneath.
The below diagram shows how Karpenter works.
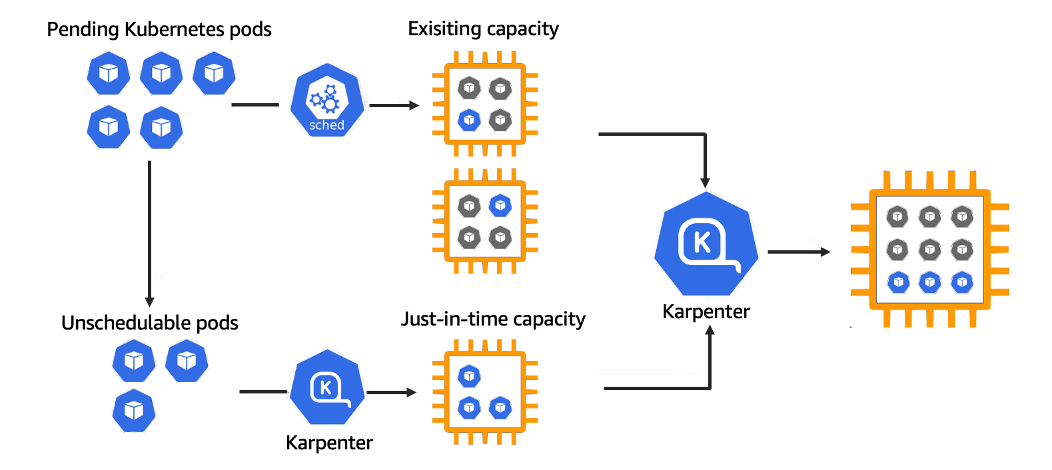
Karpenter observers the events within the Kubernetes cluster, and then sends the commands to the underlying Cloud Provider to provision or deprovision the nodes.
If you wish for me to write a tutorial on how to set up Karpenter, let me know in the comments below, and I can set it up for the next article!

So, what does Karpenter do that Cluster Autoscaler doesn't?
Well, first I thought Karpenter is a more complex solution than Cluster Autoscaler, because I already worked with the Cluster Autoscaler. The fear of the unknown, I assume. But, it turns out it's the other way around. Cluster Autoscaler is a more complex and strict tool to set up than Karpenter.
Following are some of the remarks I found during my research.
Proactive vs Reactive
Karpenter is more proactive in scaling up nodes - it looks at the actual Workloads, while Cluster Autoscaler is more reactive and does the readjustments of nodes when new, unscheduled pods are present.
Karpenter reviews the resource requirements of all unscheduled pods and then selects the instance type which fulfils the resource requirements. Cluster Autoscaler manages nodes based on resource demands, and it works with predefined Node Groups.
Let's say you have 100 of pods you want to run on your cluster. The Cluster Autoscaler will do some calculation and spin up 2, 3 additional nodes, depending on the number of pods to support the scheduling. Karpenter, however, can ask for a single, larger instance instead, to support the scheduling. It looks at underlying Workload (Pod) when it does the scaling.
Fine-Grained vs Strict
Karpenter has a fine-grained control over life cycle of Nodes through Time-To-Live settings. Cluster Autoscaler focuses on scaling the number of nodes up or down within the predefined Node Group.
Let's say you want to optimise costs, and use different types of instances in your Kubernetes cluster. Karpenter will let you configure a mix of dedicated and spot instances, dynamically choosing the most cost-effective options that meet the workloads' resource demands. Cluster Autoscaler does not automatically do that and it doesn't directly manage spot instances. For each option, you will need to add the node group to the Cluster Autoscaler.
Summary
To summarise the discussion, here are a couple of points to have in mind when considering Cluster Autoscaler or Karpenter.
- Cluster Autoscaler is supported by the longer list of Cloud Providers, for Karpenter, AWS is supported, with some documentation on how to set it up on Azure.
- Karpenter has more fine-grained control and lets you automate quite a bit.
- On the other hand, with every new instance introduced in the cluster, manual reconfiguration of Cluster Autoscaler is needed.
- Karpenter has more proactive, while Cluster Autoscaler reactive approach.
In the end, whatever is the tool you choose, the idea of not running on over- or under-provisioned nodes is important. Having the ability to configure this with both of these tools is quite helpful. For us, but in the end, for our environment.
Useful links

Thanks for reading until the end! If you liked the article, please share it. If there is something that I failed to communicate, or you want to give your impressions, feel free to use the comments below!
Thank you for helping me grow!


